Change Text Editor Back to Page Builder in Wordpress
The WordPress Editor is what you will use to create the pages and posts on your website. This page is a comprehensive guide on How to customize your WordPress.com pages and posts using The WordPress Editor.
To quickly get started, jump to how to add Content through Blocks, or choose one of our getting started tutorials here.
Table of Contents

You can use the WordPress editor to create media-rich pages and posts and to control the layout with ease. Instead of worrying about the alignment and organization of text, quotes, and images, now every element on a post or page has its own block — and you can focus on creating.
If your editor does not look like what is described in this guide, check out this helpful information about the different editors.
Elements of the WordPress Editor
The WordPress Editor is made up of three main areas; the top menu, sidebar menus, and main content area.

Top Menu Options
Block Inserter: Browse all of the available blocks, block patterns, and reusable blocks to add them to your page or post.
Tools: Choose between editing a block and selecting a block. Choose the Select tool to select individual blocks. Once a block is selected, press the Enter key on your keyboard to return to editing.
Undo and Redo: Undo an action, or redo an undone action.

Details: View the number of characters, words, headings, paragraphs, and blocks used on the page.

List View: See a list of all of the blocks that are on the page. Useful for navigating to different blocks.
Before you've published your page or post, you will see these options:

Save draft: Save a draft of your page or post
Preview: See what your page/post looks like with the theme applied.
Publish: Publish your page/post.
After you've published your page or post, you will see these options:

Switch to draft: Unpublish a page or post and switch it to a draft.
Preview: See what your page/post looks like with the theme applied.
Update: Update your published page/post with the newly added content.
Settings: Display or hide the Page and Block Settings sidebar menu.
Global Styles: If you're using a Theme that supports Global Styles, this option allows you to change font styles for your entire site.
Jetpack: Contains several options including settings to turn on/off likes and sharing for individual pages and posts, preview your social sharing, and get the Shortlink to your page or post.
Options: Opens View options, Editor style, and additional tools.
The Settings, Global Styles, and Jetpack icons in the top menu open different sidebar menus.
📌
If you don't see a sidebar menu when you're in the Block Editor, click one of the three icons in the Top Menu next to the Publish/Update button.
Settings
Global Styles
The Global Styles sidebar allows you to change the default fonts used for the Headings and Base fonts throughout your entire site. Not available on all themes.
Jetpack

Content Area
This part of the WordPress Editor is where you will spend most of your time. This is the main section of the editor, where you add blocks of content.
The editor brings with it an effortless page- and post-building experience. With blocks, you can quickly add and customize multiple media and visual elements that used to require complicated shortcodes, custom HTML code, and embeds.
↑ Table of Contents ↑
Add Content Through Blocks
In the WordPress Editor, you will useblocks to create content. There is a block for every type of element you could ever wish to add: text, images, video, audio, columns, spaces, page breaks, payment buttons, calendars, and much, much more!
Add a Block
There are multiple ways to add a block and choose the block type you need:
- Click the black + icon at the side of an empty block.
- Click the + icon at the top left of the editor. This option is great for previewing different block styles.
- Hit the Enter/Return key from a selected block to create a new block below it.
- Click on the three dots just above a selected block and choose to insert a block above or below the current block.

Once you become familiar with the names of different blocks, you can quickly add a block by typing a forward slash followed by the block name — for example,/image or /heading.

See Your Most Used Blocks
To enable the most used blocks category, follow these steps:
- Click the ellipses icon (the three dots) in the top right corner of the editor screen.
- Choose Preferences.
- Check the box next to Show most used blocks.

Once the most used blocks option is selected, you can browse the blocks you use the most through the block library.
Click on the + Plus icon in the Top Menu to access the block library. Your most used will show at the top of the library.

↑ Table of Contents ↑
Move Blocks
You can move blocks around by clicking and dragging the six dots icon in the block's toolbar that appears when you click inside a block. You can also use the up and down arrows to shift a block one spot up or down:

Alternatively, you can use List View to see a complete list of blocks on your page, and click and drag blocks into new positions:

↑ Table of Contents ↑
Customize Blocks
Each block has its own settings. To find them, click on a block and this will reveal a toolbar at the top of the block. You'll also find additional settings in the sidebar to the right of the editor.
Examples of Different Block Toolbars


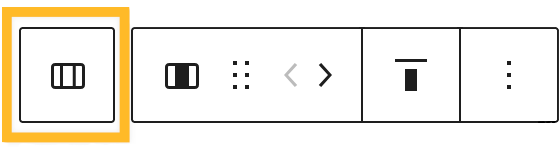
Block Settings – Toolbar
Click on the three dots to the right of the block toolbar for additional options that are present in most blocks.
- Hide Block Settings closes the settings menu.
- Duplicate creates a second block on the same page with the same content.
- Insert Before/After adds a new block before or after the current block.
- Edit as HTML switches the block to the HTML version of it so you can edit the HTML directly. When editing as HTML, this option changes to Edit Visually.
- Add to Reusable Blocks allows you to create a block that can be used on other pages that retains the content and styling of the block. Learn more.
- Group places the block inside of a Group block.
- Remove Block deletes the block from your page/post.

The Block settings on the right of your screen will provide different options based on what block you're using.
In the screenshot to the right, the selected block is a Paragraph, so the options include changing the font size, font and background color, and advanced options for creating page jumps or adding a CSS Class.
📌
If you don't see the Block settings on the right of your editor, click the ⚙️ settings icon (that looks like a gear or cog) next to the Publish/Update button to expand the sidebar menu.

↑ Table of Contents ↑
Change Block Type
What if you'd like to change a block to another block? No problem! You can transform each block to another similar or related block type. For example, change a paragraph to a heading, a list, or a quote:

↑ Table of Contents ↑
Block Navigation (Selecting Blocks)
As you create detailed layouts, it's important to learn how to navigate through all the blocks on the page, so that you can make changes easily.
List View
To access List View, click the icon that looks like three horizontal lines above each other at the top left of your screen:
This will show you a list of all the blocks you have inserted into that page or post. It makes it easy to see the structure of your page and select an existing block you wish to work on. You may also click and drag blocks here to move them to a new position, duplicate a block, remove a block, and more.

Parent Block Selector
Some blocks arenested inside of other blocks (called their "parent" block) and you need an easy way to select the parent block.
You can use List View as covered above, or you can use the parent block selector that is shown in the block toolbar of some blocks:
Clicking inside a block that has a parent block will show a button offset to the left of the block settings toolbar. Clicking that button will select the parent block.
This can be useful in many cases, such as if you can have some text inside of a Column block and you need to select the Columns block, or if you have multiple buttons inside of a Buttons block and you need to select the overall Buttons block.
↑ Table of Contents ↑
Remove a Block
To remove a block, select the block and click the three dots in the toolbar right above it. Among the settings there, you will see the option to remove that block.

↑ Table of Contents ↑
Block Patterns
Block Patterns are a collection of blocks that you can insert into posts and pages. They are a quick way to add content in visually appealing patterns.
There are many different categories of block patterns available, including galleries, columns, quotes, lists, buttons, headers, and more. The library of block patterns is always growing!
To insert a block pattern:
- Click the + icon in the top menu to add a new block.
- Click on the Patterns tab.
- Click on the pattern you wish to insert and the pattern will be inserted into the page at the position of your cursor.
For more information, check our guide to Block Patterns.

↑ Table of Contents ↑
Preview the Page or Post
Even though the block editor gives you a visual representation of what the page will look like when it is published, there can be small changes to the look once the theme or theme customization is applied.

The Preview option loads the page you're working on, along with the theme and saved theme customizations (like custom CSS).
Preview also provides the option to see how your page or post will look on a desktop, tablet, or mobile device. With the WordPress Business plan or higher, you can also preview how your page will look in search and social shares.

↑ Table of Contents ↑
More Options
Customize your editing experience to suit your needs through the three dots to the right of the Settings icon.
View
Provides options for where the block toolbars appear when you're editing.
Editor
By default, you're in the Visual Editor. Switch to the Code Editor to view the entire page in HTML code.
Tools
Manage existing reusable blocks, copy all content to paste to another page, or learn about the keyboard shortcuts.
Options
Choose what page/post settings show up in the sidebar.

↑ Table of Contents ↑
Frequently Asked Questions
How do I edit HTML in the WordPress Editor?
There is a Custom HTML block you can add if you want to create your own HTML code.
Other options for editing the HTML code in the WordPress Editor can be found here.
Not all code will work when editing as HTML. If your code is well-formed and without error, check to make sure it's on the approved HTML tags list, and that it's not a restricted code, like JavaScript.
How will my existing content look when switching from the Classic Editor?
If you've switched from the classic editor to the block editor, your current content should look the same as it did before. If you edit an existing post or page in the new editor, all the content will be placed in a Classic Block, which will treat it the same way that the previous editor did. Here's more information on converting to blocks.
Why doesn't my content look the same in the editor and on the site?
You may see some variation between your content in the editor and on the site, largely because of the way your theme displays different visual elements. Some themes will include styles to help the editor look more like the front of the site; others will not. If your theme includes a sidebar, for example, you won't see it in the editor, which may affect the width of your content when it displays on the front of the site.
Why are some settings available on one of my sites, but not another?
If you have the WordPress.com Business or eCommerce plan on a site, you might have plugins that add custom blocks to your editor. These will not be available on another site that doesn't have that plugin.
Some settings in blocks — "wide" or "full-width" — need to be supported by your theme. While the same blocks will be present on different sites, the specific settings you can apply to those blocks might be a bit different based on your active theme.
Will I still be able to use the old editor?
The old editor, also known as the Classic Editor, can be used inside of the block editor thanks to the Classic block. Here's how to use the Classic block.
Do shortcodes still work?
Yes. The editor comes with a Shortcode Block, which you can use for shortcodes just like before. In the future many shortcodes will become their own blocks.
Is this editor accessible?
Our aim is for the WordPress Editor to be as accessible as previous editors if not more so. We want everyone to be able to use it. The WordPress Accessibility Coding Standards state that "All new or updated code released in WordPress must conform with the WCAG 2.0 guidelines at level AA." This will be no exception. If you come across an accessibility issue please contact us.
Do I need to use a particular theme for the new editor?
No. The new block editor will work with all themes. However, only some themes might support specific layout features (like "wide" and "full width" content).
Where can I see a full list of keyboard shortcuts?
A full list of keyboard shortcuts is available in the WordPress Handbook.
How can I see things like word count and spell check?
To see the number of words you have used in your page or post, click the information icon that looks like the letter i with a circle around it at the top left of the screen. This option shows on desktop only, not mobile.
There is no spelling and grammar check only because all modern browsers now include spell check by default. You can rely on that for correcting spelling errors in posts.
Change Text Editor Back to Page Builder in Wordpress
Source: https://wordpress.com/support/wordpress-editor/
0 Response to "Change Text Editor Back to Page Builder in Wordpress"
Post a Comment